Wartung
Röhre
Kollimator-Linse
Spiegel
Aufbau der Spiegel
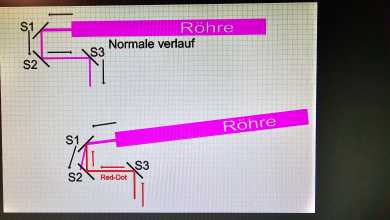
Alle CO2 Laser sind in etwa gleich aufgebaut. Die Spiegel bestehen aus Borsilikatglas und schlucken immer eine kleine Menge Energie vom Laser, vor allem wenn sie verschmutzt sind. Das Ziel ist es, so wenig Energie von der Röhre zu verlieren wie möglich. Der Laserstrahl kommt aus der Röhre und wird durch die Spiegel umgelenkt. Sie muss dabei grade zur Gantry sein. Die Spiegel Mirror 1 werden auch im Folgenden Spiegel 1 oder S1 genannt.


Spiegel 3 richtet den Laserstrahl nach unten auf das Werkstück. Eine Kollimatorlinse bündelt das Licht auf das Werkstück. Justiert wird der Laserstrahl IMMER von der Röhre aus, nicht anders herum.
Puls Settings
Was ist Akkurat, was ist Präzise? Welches Ergebnis will ich haben?

Welche Schrauben muss ich drehen?
Die Diagonale Schraube wird nur gedreht wenn Links/Rechts oder Hoch/Runter nicht mehr gedreht werden kann
Warum ist es wichtig die Mitte zu treffen?
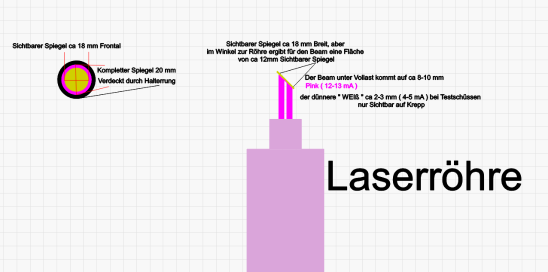
Der Laserstrahl ist nur im Testmodus so klein. Unter Last nimmt er einen Großteil des Spiegels ein. Durch den Winkel hat man noch weniger Fehlertoleranz. Jede Fehlstellung frisst Energie. Folgende Grafik ist für einen kleineren Laser als unseren.

Warum kann man keinen Laserpointer benutzen?
Man bekommt den Laserpointer niemals korrekt ausgerichtet auf die Laserröhre. Das mag in einem Laborversuch funktionieren, aber bei einem Laserpointer auf der Distanz von unserem Lasercutter vergrößert sich die Fehlerquelle enorm.

Understanding the Laser Path
The CO₂ laser starts from the tube at the back of the machine. It reflects off three mirrors before reaching the laser head, where it is focused onto the material. Over time, these mirrors can shift, which is why alignment is necessary for optimal performance.w
Accuracy vs. Precision
When aligning, accuracy means hitting the center of the mirror, while precision refers to consistently hitting the same spot. For mirrors 1 and 2, precision is more important than accuracy. Mirror 3, however, requires both accuracy and precision to focus the beam properly through the lens.
Alignment Process
Most laser engravers use the "pulse-tape" method, where small adjustments are made based on the laser's burn marks on the tape. Here’s the simplified alignment process:
- Laser Tube to Mirror 1: Ensure the pulse hits mirror 1 within its guide hole. Adjust the laser tube if necessary.
- Mirror 1 to Mirror 2: Place tape on mirror 2, pulse, and check the mark. Adjust mirror 1 screws until the pulse consistently hits the same spot.
- Mirror 2 to Mirror 3: Repeat the tape-and-pulse method. Adjust mirror 2 screws until the beam hits the same spot on mirror 3.
- Mirror 3 to Bed: Finally, ensure the laser beam hits the workpiece through the center of the nozzle by adjusting mirror 3.
Tips for Success
- Adjust small amounts (1/8th of a turn) at a time.
- Always wear eye protection.
- Don’t rush—alignment may take several rounds, but it’s crucial for optimal cutting and engraving performance.
By following these steps and taking your time, you’ll master CO₂ laser beam alignment and keep your machine running smoothly. Once aligned, you’ll rarely have to repeat the process.
